Showing posts with label costume. Show all posts

Wednesday, December 18, 2024

From Tank Top to Ice Princess

Comic Con was coming! Winter Edition, that is. Which meant my daughter came up with the perfect costume idea. She wanted to be an Ice Princess this time. So follow along as I take the first step with an old tank top of mine to create the perfect Ice Princess cosplay!

This tank top of mine was one that I only wore at home. It was a little on the big side, even for me. So I had to trim it down about 4 inches on either side. 

My mother had sent this homemade cape she found a couple years back. We decided to use it as a removable skirt piece that gave her a bit of a train. 

Then, she needed something to make her more regal. In comes another piece my mother had sent a while back. 

This was a curtain! But now, it is getting new life as flowing sleeves and cape. Reminds me a little of Elsa from the Frozen movies. But don't say that to my daughter, she doesn't want to be anything like Elsa. That is just way too old for her! So I started sewing the edge to the tank top shoulder edges.
This allowed it to drape behind her back. To make it sit better, I sewed lines, gathering it together along her back.

We had get a long sleeve shirt for her to wear under the dress. This allowed her to be better covered as the tank top kept falling too low. It also kept her from being irritated. She is very much a texture girl and some materials cause irritation to her skin.

She wanted just a little bling on her dress. So I found this plastic piece that came from a broken toy crown. When you put it upside down, it looked closer to icicles. We glued that down to the dress neckline. 

Her crown was one I had 3D printed a long while back when the printer was working. It is actually from glow-in-the-dark filament. She pulled it out of her costume collection to be her crowning piece! *pun totally intended*

She looked fantastic! And I was so proud of her. She is learning to cosplay with us. She is putting thought into her looks. So, let's look at the finished product! 
We even brought icicle pieces for her to hold, but of course they were forgotten in moms pockets. What do you think? Leave me a comment below and let me know your thoughts. What might you have added to make it better?

Tuesday, August 20, 2024

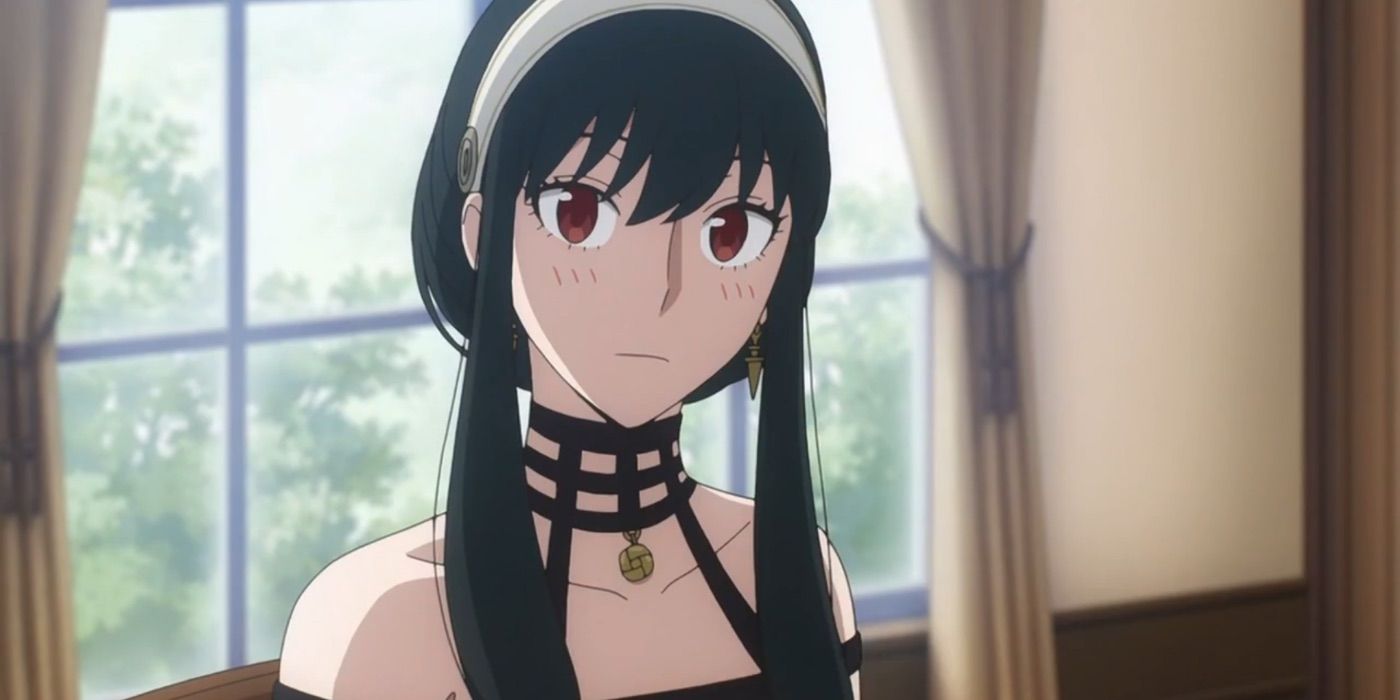
Bringing Yor Forger to Life

My daughter loves Yor Forger from Spy x Family. She asked me to help her construct a costume for this year. Maybe to wear for her birthday or for the Police Halloween Bash. Either way, it was going to be quite the undertaking. However, I'd like to say we pulled it off pretty well!

Starting simple!

She had this form-fitting black dress that was sent to her. That was the base. I picked up black and red fabrics from Walmart to create the longer train piece in the back. This was way easier than I had thought it might be. I really just pinned the two, good sides in, together. Then cut out a rectangle. Once sewn together for the most part, I flipped it right side out and sealed it. Then I sewed it to the dress.

We went to the local Goodwill and happened to find thigh-high black boots. Crazy note - she and I both fit these boots! And then at the Spirit Halloween store, an employee gave us some Alien Tape that is crazy good double-sided tape to hold them up with.

Spy x Family Yor Cosplay Brings Out the Thorn Princess' Elegant Side With  Stunning Shoot 

Then you have the strips of fabric that go across the shoulders and chest. I used some scraps of fabric that I sewed into clean strips and then attached them to the dress. I also did this to make the sorta choker-looking piece.

We found a close enough match for the gold piece that goes on her choker. This I primed and painted as well. 

Time for the headpiece

The headband with roses came from Dollar Tree! I got a wide, fabric-covered headband and we grabbed a flower bunch. These I had added a primer+paint coat to. Then I went over them with gold.
The roses I was also unable to hand paint, so I used the spray paint on them too. I 3D printed the spikes that go on the headband as well. Giving them a paint job too.

Accessorize!

The earrings were 3D printed. Then spray painted gold. I used a primer+gold paint on this as well. I had some earring hardware on hand to attach these to.

She chose to purchase a wig from Amazon that we would style to match Yor's. She wanted to try our hardest to make sure it would be in time for her birthday celebration on Saturday. But then that dreaded email came! It was running late and not expected to arrive until Monday. Thankfully, it showed up on Saturday just not in time to be worn out while celebrating. It will need some styling, but looks pretty good on her. 

And finally!

We have the silletto daggers. I 3D printed the bottom parts, but still have to get the loop part on top. I'm just waiting to get some regular filament since apparently silk filament doesn't like to print too good for us. 

Before the daggers and wig!

Well, that is all I can show on here. For safety reasons, her face needs to be obscured. But what do you think of the cosplay? Did I get it close enough? I've been pouring over pictures of Yor online trying to get it just right. Let me know if you think I missed something! 

Thursday, May 16, 2024

From Poker Set to Cosplay Case

My husband had an amazing Resident Evil cosplay that was sure to thrill when we went to comic cons. We need to do some changes to it as my cooking has added some pounds (unless he keeps dropping due to his new dieting!). 

We have been looking for a case to use to make a vial case for his virus vials. That is why I was so happy to find this poker set case! Granted, it had the poker set still in it. That's going into our next garage sale. For now, let's see how we can transform this box into an accessory that is fit for the admiring crowds.
This is a fancy-looking briefcase essentially. At least in looks. We picked it up at the Goodwill for about $6. I repaired one of the edges that had popped loose. Gave it a good cleaning too and it started to shine. It had a chip attached to the handle, but I removed that too. We are not doing a casino look here people.
This is the inside. Time to remove things! All the tray comes out in one move. So I can just put that and the contents into a bag for the yard sale.

Now, time to insert the foam that will cradle those virus vials. Can't have the virus spreading around, now can we? 

We had 4 vials that we purchased years ago when we first thought to make something like this. And they fit perfectly!

What do you think of our cosplay addition? Is there anything else you can think of to add to make it better? I was thinking we might need to add the Umbrella Corporation logo to the front of the case.

Thursday, December 14, 2023

Titan Hunter, To the Rescue!

My kids love the Attack on Titan anime series. Both of my daughters think of Mikasa Ackerman as the ultimate hero. So I was not surprised when my oldest girl wanted to create a cosplay of her. What did surprise me, was how involved my daughter chose to be in making it herself. And that is what made me the proudest! Personagem da Semana: Mikasa Ackerman

She even purchased the foamboard pieces herself. Then measured out the parts she wanted glued together to make the ODM (omni-directional mobility) gear. ODM gear in Attack on Titan explainedEmpty, clean Pringles chips cans made the gas canisters on top. Cut strips of faux leather made the straps that her belt could go through to hold the gear to her hips. She also cut the blades for the ODM and put slots into the box that the blades could slide in and out of with ease!

A little boy at the comic convention we went to, was absolutely thrilled to see her ODM gear!! It was an adorable moment. His dad just smiled and tried to pull him along so they could continue down the vendor aisle. 

She pulled out a pair of jeans and her boots - this was all done pretty short-notice, so she was working with what she had. Then she put on a plain white tank top. Now for those details up top. She took a thin belt and put it across her chest. Over that she had a jean jacket. To make sure it was noticeable that she was with the Training Corps, she had me print out the emblem they use so that she could draw her own!

This, we sewed to the back of her jacket so that she could later remove it. Since this is a jacket that she uses often and eventually she wanted to create a more authentic Mikasa cosplay, we wanted this to be temporary. 

She even cut and hemmed the skirt-like piece that went around her waist. Now, for that last crucial piece - the red scarf. If she had the time, I would have had her crochet it. But we were running short on time. So I had her cut an old shirt of mine instead. It wasn't finished, as in with a nice hem and even lines, but it still looked fantastic and even made her look as though she was battle-scarred a bit. 

I can't tell you how proud I was to have people recognize my daughter and congratulate her on her creation! Even one of the guys at the Cosplayers table praised her ingenuity. 

Her sister was equally dressed up as a Jurassic World Dino Caretaker! She wore her classic Jurassic Park tee-shirt, some leggings and booties, the badge I had made her for her birthday, and best of all - her two baby dinosaurs in a bag! She found others who shared her passion and was so happy to be able to take a picture with them. The lady on the left was wearing a Jurassic Park jacket.

And of course, I dressed up too! After all, I lead by example and never let a chance to become a character I love pass me by. Meet the time traveling pirate. I even had fake gems I had planned to hand out (but I spaced and totally forgot to!).

If we are able to, I'd love to go back in March. My husband, however, really wants to go to a bigger one. While this one was pretty neat, it was also a small-town con. Most of the vendors were 'cookie cutter' sellers. Basically, everyone had pretty the same things to sell as other vendors there. Very few were original. We shall see what the new year holds! In the meantime, I promise that I will keep you updated with new creations.

Wednesday, October 11, 2023

The Making of a Steampunk Chapeau

I love creating new cosplay pieces. Especially when I get to do so in my Steampunk styles. I have a couple extra hats that have been waiting for more, and I decided it was high time to get started. 

My husband has wonderful ideas! When I'm wanting to be creative, but my mind is flooded and I can't seem to find my kick-off, he is usually there with a great idea to jog my abilities. This time was no different. I wanted something unique. More than just a couple gears and some goggles. Steampunk has all kinds of designs though. And one can get lost in the rabbit hole! He said, "What if you did one with a cuckoo clock on the front?"

Well, there is something I don't think I have ever seen! I went searching online, with no luck. I also had difficulty finding tiny clocks. Thankfully, Thingiverse came into play with a 3D printable version that I thought would work just fine. Check out this one!

I printed one and set about to painting. The tiny details are so cool, but made for quite the challenge. Overall, I'm proud of it.
Of course, this one isn't complete without a clock on the front. Not a real one - that would take my husband's engineering skills to accomplish. Instead you could use a charm version. Or maybe a tiny bird... Like this one that I printed at 30% its original file size. I decided I preferred a bird instead. How adorable is this?!

I attached this to the front of the hat. It would be my centerpiece for this one.

I decided to find some feathers for this one. I mean after all, what glorious top hat doesn't have feathers? Who would have thought it would be difficult to find normal-looking feathers though?? I found these at the local Hobby Lobby for about $3. They were in the faux floral department. I trimmed the stem they came with and inserted them through the ribbon, as well as added some glue to keep them from falling out. Now that I have gotten to the end of decorating this particular hat, I have decided that I'm going to go get one more of these for the other side.
As you can see, I've also added in the gears that are ever so loved by Steampunk fans. But let's face it, I'm a lady. I want to show some bling. And what is more classic than pearls? So I took an old string of pearls that was a necklace (clasp broke), and added it to the brim.
It wasn't long enough to go around the entire brim, though. So I sewed on some single beads I had. I added pearls above the little chimney to look like smoke puffing out.
And finally, on the back of the hat, I added this piece that came off a headband we were given. No matter which angle you see me, it will be stylish!

While that one was waiting for more pieces...

I decided to go ahead and start the second hat. I wanted a nautical theme. So back to the 3D printer I went. This one came with goggles attached to it already. So, I knew I would be working around those.

I printed off this tiny pirate ship and set about to giving it a paint job. After all, black on black is hard to see.The ship and masts are a golden brown wood color now!
Then I printed this
ships' wheel with a mermaid figure emerging from it. I painted it brown to be as wood. Then gave her some silver scales scattered on her tail. But Steampunk needs some futuristic aspect, so I wanted a flying pirate ship too. Or something like a Yules Verne Nautilus submarine. So I chose this

Each piece received help staying in place by tacking them down with needle and thread. I would absolutely be devastated if while bowing the head, a piece fell off!

I used some of the glue to hold it steady, then thread and needle to actually tack it into place more firmly. As with the other hat, I needed to add some bling. So I took a pearl headband that didn't fit so well on my head, and attached it to the brim of the hat.
Then I added some gears with a rhinestone sewn in for good measure.
The only thing missing now are the feathers! Well, maybe some tulle at the back. Actually.... yeah, that sounds like a fitting finish. What do you think? Is there anything else I should have added or taken away even? Leave me a comment below! I'd love to get your insight. Until next time!