Wednesday, January 29, 2025

Giving the Barbie Closet Some Upgraded Looks!

I couldn't pass up this Goodwill find. It made me immediately think, What a perfect store starter! However, after looking it over and having a poll on Instagram, it seems more people wanted to see what kind of an upgraded closet I could come up with. So... I have all these little Mini Brands set aside to recreate a store in 1/6 scale when I find another one. I even have a Re-Ment set my husband got me on clearance recently. International section, perhaps?? But back to my closet. Let's see what we can create with this! 

The original is Barbiecore to the core! I'm not a fan of Barbie colors. I prefer something a little more realistic. First steps I took were to paint the outsides with a paint+primer blend. This adheres well to the plastic and was how I did things with the Jurassic Park jeep makeover.

I taped off what would be a window. I know it is pink, but I have no choice. I want something that resembles a window or glass door. Maybe one day I will get to swap that part out. For now, it stays and won't be covered with paint.
Front and back were painted with the grey I had on hand. Don't worry about the cardboard inserts. I have a plan for changing those later.
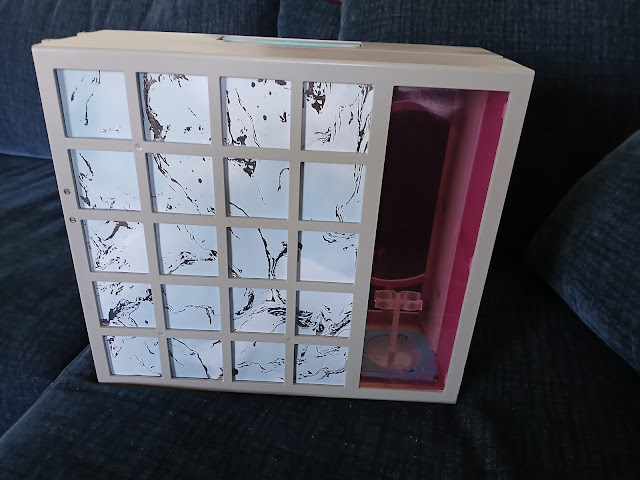
So here is the front. That marbled design is from a card stock page meant for scrap-booking. But I think it adds a pretty outside look. This was glued to a thin cardboard piece. On the other side of that cardboard is where I put my inside paper. This was printed and gives off that calm, almost Japanese-styled look I was wanting.
In order to get this to work, I did have to pry the white shelving units out. That was no easy task, by the way! And yes, the seams make it a little less how I envisioned. But for now, I'm going to roll with it.
So this is where it is was at after adding the new background pieces. One side was painted a darker grey. I ended up having to buy more paint and could only find a different shade. Then I salvaged the mirror from the original cardboard background, but decided it needed a nice frame before I added it to the new background.
Using cut popcicle sticks, I painted them white before adding a green glow-in-the-dark paint. Then I framed the mirror. After digging into my bits and bobs drawers, I found some wooden pieces that were included as spares to a Steampunk clock I had received a while back. After arranging, painting and gluing in, I think they add to the Japanese style. What do you think? As an added bonus, I like having it glow in the dark. Kinda like a portal.
I made the hair dryer from a broken headphone piece and some craft foam. Then I used a broken off piece from jewelry to make a hanging hook for it. Now Barbie can do her hair at the counter. But enough reading! Let me show you, in my video, the rest of what I did.
Well, there you have it! Barbie has a new dream closet that actually works well for storing things. What do you think? Is there something else you'd have added? Leave me a comment below and let me know! Another project is on the way.

Tuesday, January 14, 2025

The Game Room Gets an Upgrade!

I have been working on my 1/6 scale world on and off, as time and materials are available. This Christmas, I received so many things towards it that I was a little overwhelmed. And, halfway through January, I'm still sorting through those gifts! But one thing in particular has finally been integrated into its new place. Suzette has a game room, that now has an arcade game console! We have made new friends here in our lovely town. One of those is Kaleb at Portals 3D. He does amazing 3D prints with his Bambu machines. With my printer out of commission, we talked to him about things he made for RetroFunk. Like a bunch of mini arcades. And this beauty is what he created for me! 

Check out the DigDug arcade console he printed. He even added the art decals and battery operated lights. It is amazing!

It wasn't quite tall enough, so for now it is on a raised platform made of a box. Eventually, I will change that. Can't help it that Suzette is taller than most!
Kaleb really puts in effort to make every one of his 3D printed gems to perfection. He has incredible attention for details.
When I said, "Surprise me" I never thought he would go this far to do so! But I'm so happy he did.
It suits the game room theme I have been building. And I'm thinking I might ask him for help on printing the consoles I'm missing... But I'll show you that part later. For now, I want to give him a huge shout out! Much thanks to him for this addition. I also want all of you to know you can reach out to him and check out his
Facebook page to see some of his other creations. Like these...

And like this one. I had also bought this clock for my husband for Christmas.

What are you thoughts? What is your favorite thing he made? Leave me a comment below! And don't forget to visit his Facebook page.

Thursday, January 9, 2025

Barbie and Miniatures Alert

Have you heard that Party City and Big Lots are closing down this year? All their stores! We decided to take a look around early and see what is on sale. 

Party City prices are already higher than most retail stores, so the preemptive sale prices have brought them closer to places like Walmart. So keep that in mind.

There were these cowboy hats that looked like a decent size for dolls. All these themed items are marked 20% off.
These beverage cozy covers look like a perfect fit for dolls. They can get festive!
All these were called party favors! Barbie mini land items. And they are on markdown too.

I love these little umbrellas. They make cute miniature parasols.
These little backpacks are in the party favors section. One thing I noticed was that price tags were removed from some areas, making it impossible to check how much they were.
These MiniVerse capsules were about $12.50 each. Which is about $2-$3 higher than Walmart, usually. So taking only 10% off wasn't worth it for me.
All these are in the party favors section too. But way too pricey.
They even had dolls.

I was hearing that the goal was to have the stores closed down by the end of January or in February. 

Big lots had signs claiming 10-50% off various sections. But when we got to the checkout, we came to realize that they had either marked up the products, or the signs were way off. Most things only gave me about a 50 cent discount regardless of the amount. Our local store was still receiving trucks as well. So their distribution center is still going. The cashier said they probably won't be ready to fully close out until the end of February at least. So just keep that in mind if you check out your local store. And let me know your thoughts. Are you going to miss either of these stores when they are gone? Are you looking forward to some hot deals?

Wednesday, December 18, 2024

From Tank Top to Ice Princess

Comic Con was coming! Winter Edition, that is. Which meant my daughter came up with the perfect costume idea. She wanted to be an Ice Princess this time. So follow along as I take the first step with an old tank top of mine to create the perfect Ice Princess cosplay!

This tank top of mine was one that I only wore at home. It was a little on the big side, even for me. So I had to trim it down about 4 inches on either side. 

My mother had sent this homemade cape she found a couple years back. We decided to use it as a removable skirt piece that gave her a bit of a train. 

Then, she needed something to make her more regal. In comes another piece my mother had sent a while back. 

This was a curtain! But now, it is getting new life as flowing sleeves and cape. Reminds me a little of Elsa from the Frozen movies. But don't say that to my daughter, she doesn't want to be anything like Elsa. That is just way too old for her! So I started sewing the edge to the tank top shoulder edges.
This allowed it to drape behind her back. To make it sit better, I sewed lines, gathering it together along her back.

We had get a long sleeve shirt for her to wear under the dress. This allowed her to be better covered as the tank top kept falling too low. It also kept her from being irritated. She is very much a texture girl and some materials cause irritation to her skin.

She wanted just a little bling on her dress. So I found this plastic piece that came from a broken toy crown. When you put it upside down, it looked closer to icicles. We glued that down to the dress neckline. 

Her crown was one I had 3D printed a long while back when the printer was working. It is actually from glow-in-the-dark filament. She pulled it out of her costume collection to be her crowning piece! *pun totally intended*

She looked fantastic! And I was so proud of her. She is learning to cosplay with us. She is putting thought into her looks. So, let's look at the finished product! 
We even brought icicle pieces for her to hold, but of course they were forgotten in moms pockets. What do you think? Leave me a comment below and let me know your thoughts. What might you have added to make it better?